

Introducing Coffee Density Assisted Extraction tools
Under-extracted coffee is sour, and over-extracted is bitter.
The recipe sequences and adjustment tools on this site will help you quickly and easily dial in your extraction to avoid sour or overly bitter coffee, dial in coffee like a pro, and achieve it up to 5x faster. You don’t have to measure your coffee density to use the system, but it is much faster and better if you do.
It is easy to over-extract a dark roast, and it is also easy to under-extract a light roast. By measuring the density, you get a starting recipe more likely to suit the extraction required for your roast level.
You also get much more effective adjustments. If it is sour, extract more by using a higher-numbered recipe. If the coffee is bitter, extract less using a lower-numbered recipe.
Now, you can avoid sour and bitter coffee easily and quickly instead of using up most of your bag of beans blindly trying to figure out the right formula.
Coffee Density - Density Assisted Extractions (DAE)
DAE stands for Density Assisted Extraction. A catchy coffee acronym like WDT and RDT.
DAE is a VARIABLE coffee recipe system, where each of the ten extraction parameters is set relative to the 158-point range of measured roasted bean density. You measure the density, then enter it into the density.coffee website. The website does all the calculations for you, providing appropriate espresso, filter recipes, to tell you how to handle your coffee.
Compared to a traditional FIXED coffee recipe, e.g. (20g in, 40g out, 1:2 ratio, 93c, 25 sec), the grind size is the only parameter that changes. FIXED recipes assume everything is roasted to 2 levels, either espresso or filter. Which, apart from being demonstrably not true, also limits what you can use the espresso method for.
You must make large changes with a fixed recipe because grind size is your only tool. Often, it takes a lot of trial and error to dial in a new coffee. Many people may never experience well extracted coffee and get used to bitter coffee.
Think of the espresso recipe with all its parameters as a combination lock with ten wheels. With a FIXED recipe, 9 of them are most likely in the wrong place, and you are turning one wheel (grind) in the hope of unlocking it. Much of the time, it’s just not going to work.
With DAE, each parameter varies relative to the 158-point density measurement. This achieves the right level of extraction for any given coffee roast level. DAE results in much less dramatic changes in grind size, much less dialing in, and a greater ability to cope with a wider range of roast levels. You would be amazed how often you nail a new coffee the first time.
When thinking of the espresso recipe as that combination lock with its ten wheels. Using the DAE method puts 9 of the wheels in the correct place, and you are making a minor grind adjustment to the last wheel. Cracking that combination and achieving the best extraction is much easier.
Until now, there really has not been a good tool to measure roast level, so Roast Level has been ignored as something that needs to be factored in. But now there is a cheap tool and a good method of measuring it. If you want to be able to handle an endless variety of different coffees reliably, a measuring cylinder is a low-cost thing to try with a great return on investment.
If you only ever use your one favorite blend that never changes, maybe you don’t need DAE so much. But even then, today’s mid-roast is much lighter than when that standard fixed recipe was invented, and you could benefit from some tweaks.
What is a good extraction?

When we look at the total mass of a coffee bean, only 30% of it consists of solubles. The other 70% of the bean comprises insoluble fibers and carbohydrates that create the beans’ structure.
About 20% of the bean contains good solubles, and the other 10% are bad and taste awful. To brew the best cup of coffee, we must try and release the good solubles while leaving the bad ones locked up in the cells.
Luckily, the bad solubles are larger and take longer to dissolve than the good solubles, so we can vary the extraction parameters to try and achieve an extraction that avoids sour under-extraction and bitter over-extraction.
An Intuitive Guide To Coffee Solubles, Extraction, and TDS (handground.com)
Maximizing your extraction yield is not something you should do; you will end up with bitter coffee.
The optimal guidelines set by the SCAA for extraction are 18 – 22%. This means that when we take the total weight of our coffee beans, 18-22% of that mass will be dissolved by water and end up in our cup.
However, the problem is how easy or difficult it is to extract just the right amount, which changes completely with the Roast Level.
What are the Roast Levels?
Coffee beans have some of the strongest cell walls in the plant kingdom. They have external rings that reinforce the cell, increasing its stiffness and strength.
When coffee is roasted, the increased temperature and transformation of water into gas create high-pressure levels inside the beans. These conditions change the structure of the cell walls from rigid to rubbery, creating a physical change in the coffee. This happens because of the presence of polysaccharides (bonded sugar molecules).
The internal matter pushes out towards the cell walls, leaving a gas-filled void in the center. This means that the beans expand in volume as they decline in mass. Much of the gas build-up is carbon dioxide that will be released after the roast.
Roasting also increases porosity, making the beans less dense and more soluble.
Physical changes coffee beans experience during roasting – Perfect Daily Grind
A very lightly roasted coffee bean remains very hard. If you have ever tried to hand grind lightly roasted coffee, you will know this. You can barely turn the crank, and it’s like grinding rocks. It is difficult to extract enough without the coffee being sour and under-extracted. All your tools and parameters need to be dialed up to the max.
On the other hand, a very darkly roasted coffee bean has become very brittle. You can easily crush it with your fingertips. It is easy to over-extract and end up with bitter coffee, and you need all your tools dialed right down.
There is a whole Roast Spectrum, and it is very cheap, quick, and easy to measure where your coffee falls on it by measuring the density.
What is Coffee Density?
Volume/weight=density. What is the coffee bean weight of 100 ml of your roasted coffee beans in a good quality (+/-0.5ml) Graduated cylinder with good scales (+/-0.1g). The Acaia Pyxis are awesome because they are accurate to 0.01gms and have a fast refresh rate or Acaia Lunar. But a good range suits every budget, such as TIMEMORE Coffee Scale Black Mirror Basic Plus 2021.
For the process, see Measuring Coffee Density.
The density has a direct correlation to the Roast Level.
The real-world range you see is from very dark roasts with 100 ml weighing as little as 33g, i.e., 0.330 g/ml, up to very light roasts where 100 ml weigh as much as 45g, i.e., 0.450 g/ml. That gives us 450-330=120 different roast levels measured in 0.1g steps.
Where your coffee falls on that 120-point density/roast spectrum dramatically changes the level of extraction required to hit the sweet spot.
Espresso is a wonderful method of making coffee. It gives you a great set of tools/parameters to manage the degree of extraction. You need to actually vary each of these parameters according to the roast level, not fix them.
- Ratio
- Dose
- Yield
- Temperature
- Pressure
- Time
In addition, there are supplementary parameters
- Basket size
- Cup size
- Coffee aging
- Grind size
- Bypass water
Every one of these extraction parameters changes relative to where your coffee falls on that 120-point roast spectrum.
And then, lest we forget it, you still have to correct for…
- Taste
I’ll cover each tool in turn and their ranges with changing density/Roast Level.
Espresso Calculations
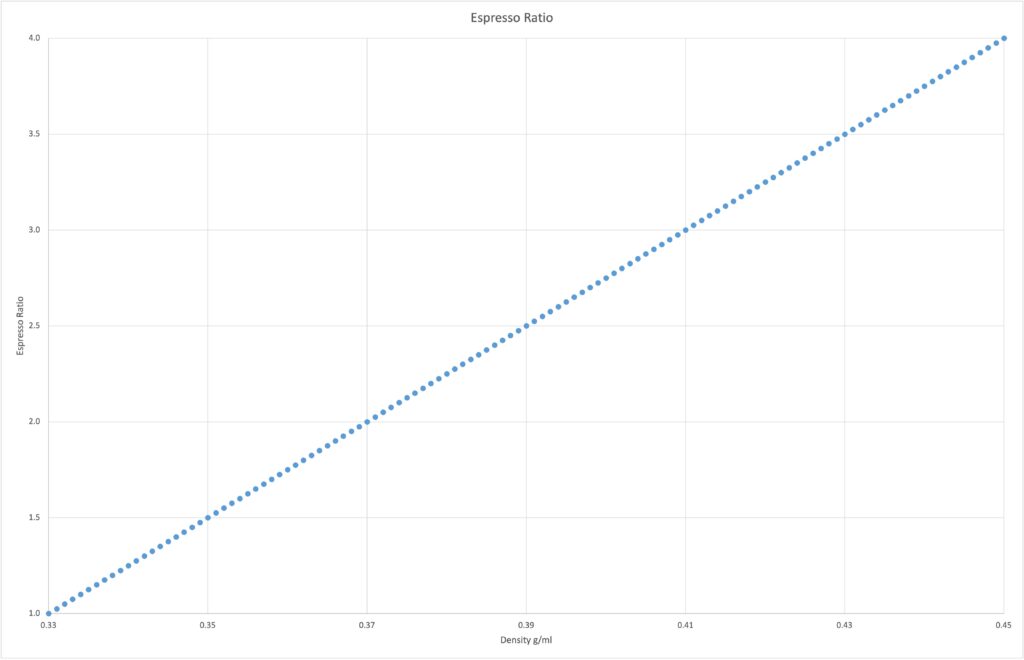
1. Espresso Ratio Calculator
Water is a powerful solvent. Using your ratio of water to a dose of coffee correctly is possibly the most powerful tool you have and typically the most underutilized.
The espresso Ratio ranges from 1:1 for a very dark roast to 1:4 for a very light roast.
If you have a very dark roast and try using a fixed 1:2 or 1:3 ratio, you will have put through far too much water, over-extracting. No amount of grind adjustment can compensate, and you will make a bitter coffee, which is why most people put a ton of milk and sugar in dark roasts.
At the other end of the roast spectrum, if you have a very light roast and try using a fixed 1:2 or 1:3 ratio, you will have put through far too little water under extracting. No amount of grind adjustment can compensate, and you will make a sour coffee. This is why most people don’t even try light roasts on espresso and use filter methods. But they are missing out because you can have wonderful taste experiences with light roasts when extracted properly.
Using the right ratio for the Roast Level, as indicated by the density, can make all the difference between success and failure.
2. Espresso Dose Calculator
Dose means the weight of dry ground coffee.
When changing the Ratios across the 120-point Roast Spectrum, it is really useful also to change the Espresso Dose.
For example, with a very light roast with a 1:4 ratio, a 14g dose produces a just manageable 56g yield of espresso. If you used a larger 20g dose, you would need a massive 80g, which exceeds the brew chamber of devices such as the Flair 58. It is much easier to achieve high ratios when you reduce the dose.
With a very dark roast with a 1:1 ratio, increasing the dose to 25g keeps the yield up at 25g.
As the density indicates, using the right dose for the Roast Level helps get the extraction right.

3. Espresso Yield Calculator
Yield means the weight of coffee made.
Yield = dose x ratio. For example, if your dose is 20g and your ratio is 2.5, your yield should be 50g. You should use your scales under your cup and stop the shot when it reaches the target yield. The important thing to keep constant is the ratio. So, if you need to lower the dose to 18g, for example, because you can’t fit 20g in your basket, your yield should be 18×2.5=45g.
4. Espresso Temperature Calculator
Higher temperatures extract soluble compounds much more easily than lower temperatures.
Light roast brew temperature Celsius is 95 degrees.
Medium roast brew temperature Celsius is 90 degrees.
Your coffee is likely to be roasted somewhere between these extremes. The optimum temperature for your roast level will fall somewhere on this scale.
Using the right temperature for the Roast Level, as the density indicates, helps get the extraction right.

Interestingly, the mid roasts, which fall around 0.390 g/ml, require 89-90c, somewhat below the SCA recommended 93c. People are waking up to the fact that mid-roasts taste better at a lower temperature than people have used in their fixed recipes. You can see this in many winning AeroPress competition results.
Flair 58 Temperature
The Flair 58 sensibly has three temperature settings.
- 1 light = 85 c
- 2 lights = 90 c
- 3 lights = 95 c
For the most common roast levels, people should be using setting 2 of 90c.
5. Espresso Pressure Calculator
The pressure was initially used with espresso to reduce the time to make a cup of coffee. The more pressure, the faster the extraction. Nine bars of pressure could produce a coffee in 25 seconds compared to a filter coffee taking 4 minutes. Pressure is a range. For espresso, 6 – 9 bars are recommended. If you have a lightly roasted dense bean, maintaining 9 bars or pressure helps cope with a finer grind and will help extract the most sugars.
At the other end of the roast/density spectrum, a very dark roasted brittle, fragile bean that is easily over-extracted, a gentle 6 bars of pressure helps cater for a coarser grind and helps avoid over-extraction.
Your coffee is likely to be roasted somewhere between these extremes. The optimum pressure for your roast level will fall somewhere on this scale.
6. Espresso Time Calculator
Increasing the shot time increases the level of extraction, so for a very light roast, going up to 40 seconds helps.
Conversely, with very dark roasts, reducing the shot time to as low as 20 seconds helps avoid over-extraction.
The time provided is for a standard 58mm basket. Small-diameter baskets have a deeper bed and require more time.
7. Basket Size Calculator VST Precision Filter Baskets
An important aspect of the espresso is using the correct ratio for the roast level, which changes the dose and, consequently, the basket.
The extremes are a dark roast requires a 1:1 ratio, and a 25g dose gives a 25g yield. A very light roast requires a 1:4 ratio. A 14g dose gives a 56g yield.
VST Precision Filter Baskets are optimized for use with specific capacities in the dose weight of coffee. The size of the holes, the number, and placement vary across the basket sizes to deliver consistent extraction performance.
VST basket hole sizes:


VST baskets produce significantly more consistent results than OEM baskets. See https://clivecoffee.com/blogs/learn/portafilter-baskets-do-they-matter
VST Precision Filter Baskets are available in 7, 15, 18, 20, 22 and 25-gram capacities.
All baskets feature…
- Unmatched Quality Control: 100% of holes are measured on every filter for min/max
range and hard limits on area and diameter to a precision of better than +/- 30 µm - All holes are measured for circularity, placement, square area, and blocked holes.
- Filters are matched for total square area opening to +/- 5% to ensure identical group-to-group
performance. (Typical filters vary from -50 to +100%) - The hole pattern is centered to +/- 1.0 mm, and placement is
oriented for uniform extraction throughout the entire puck. - The wide outlet angle prevents clogging, and the anti-wear design
ensures uniform extraction performance for the product’s life. - Improved structural integrity, 20% heavier than standard filters,
highly polished inside treatment and profile for a clean knock-out
How filter baskets affect espresso taste and barista technique (home-barista.com)
8. Cup Size Calculator
Very lightly roasted coffee requires a low dose, a high water ratio, and some bypass water (as above). Using a small 5oz/150ml cup will taste better than being washed out in a large cup.
At the other end of the roast/density spectrum, a very dark roasted bean is very ashy and burnt-tasting. A large volume of milk helps make a more palatable drink. A larger 8oz/236ml cup will taste better.
Your coffee is likely to be roasted somewhere between these extremes.
Classic Range Flat White Cup (150ml) – Acme Cups New Zealand
Classic Range Tulip Cup (170ml) – Acme Cups New Zealand
Classic Range Cappuccino Cup (190ml) – Acme Cups New Zealand
Classic Range Latte Cup (280ml) – Acme Cups New Zealand
Changing your cup size to suit your roast level is recommended.
9. Resting Calculator
The resting calculator was a feature of density.coffee, but since reading the SCA Coffee Freshness handbook and running a series of tests myself, I’ve replaced the resting calculator with storage advice on how to maximise Coffee Freshness
Roasting coffee beans causes a build-up of carbon dioxide gas trapped inside the bean, which is released over time after the roast. This is why good coffee bags have a one-way valve that allows carbon dioxide to escape while preventing oxygen from entering.
You might get sour coffee if you attempt to use coffee immediately after roasting. The theory being there is so much CO2 being given off in contact with the hot water that it prevents the water from penetrating and extracting soluble compounds adequately. Pre-infusion and bloom phases are methods to cope with excess CO2.
The concept of the resting calculator was waiting to achieve a theoretical ‘peak flavour’.
The rate of bean degassing varies considerably with the roast level. With a very dark roast, which is very porous, the beans degas very quickly and may reach their peak flavor in as little as four days after roasting.
A very lightly roasted bean is hard and dense at the other end of the roast/density spectrum. It releases gas very slowly and might not reach peak flavor until a month or more has passed.
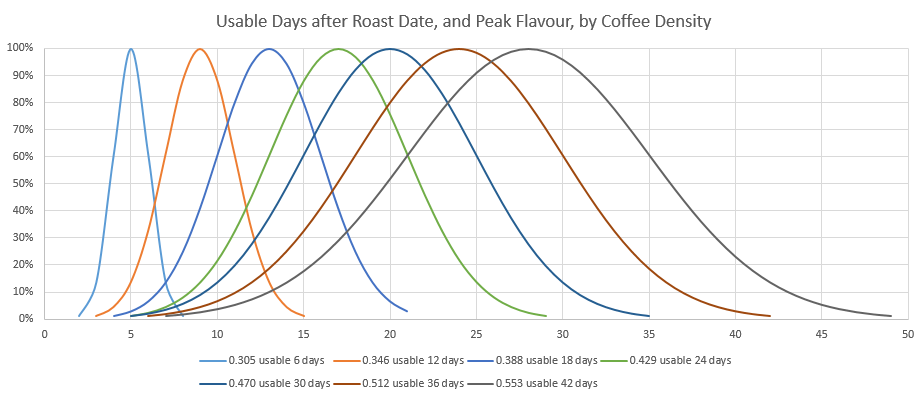
The problem is Volatile Organic Compounds (VOC) that provide aroma and flavour are lost with CO2 out of the valve. It is a one-way street, VOC are lost and lost fast. Within 10 days 90% are gone.
If you want peak flavour and aroma, you need to freeze it as soon after roasting as possible. If you are having excess CO2 issues, use pre-infusion, not resting.
10. Grind Size Calculator
The trouble is that many different combinations and permutations of espresso machines, grinders, burr sets, and basket sizes make providing a Grind Size almost impossible.
That’s not to say knowing the density can’t help with grind size. If you start recording your own ideal grind settings with varying densities, you will find you can significantly reduce your dialing-in time.
The one thing I would say is if you have set all the other parameters correctly (dose, ratio, yield, temperature, and you know the time you need to achieve, then you will need to make smaller changes to grind size, making getting your grind setting about right is easier.
You should always taste-test the coffee, even as you make it. Catch the last few drops in a teaspoon, and you will quickly see if they are still too sour and you need to grind finer or if they are sweet.
The grind setting provided is in microns for my use with Kafatek Monolith MAX with 58mm VST precision baskets. YMMV !!!
I recommend getting a Kruve Brewler and measuring the microns your grinders produce at each setting. By doing this, you will also find out how consistent your grinder is – whether it produces a range of boulders and fines or not.

| Microns | Monolith | Option-O | Kinu m47 |
| 175 | 1.75 | 0.7 | 1.2.2 |
| 200 | 2 | 0.8 | 1.2.8 |
| 225 | 2.25 | 0.9 | 1.3.3 |
| 250 | 2.5 | 1.0 | 1.3.9 |
| 275 | 2.75 | 1.1 | 1.4.4 |
| 300 | 3 | 1.2 | 1.5.0 |
| 325 | 3.25 | 1.3 | 1.5.6 |
| 350 | 3.5 | 1.4 | 1.6.1 |
| 375 | 3.75 | 1.6 | 1.6.7 |
| 400 | 4 | 1.7 | 1.7.2 |
| 425 | 4.25 | 1.8 | 1.7.8 |
| 450 | 4.5 | 1.9 | 1.8.3 |
| 475 | 4.75 | 2.1 | 1.8.9 |
| 500 | 5 | 2.2 | 1.9.4 |
| 525 | 5.25 | 2.3 | 2.0.0 |
| 550 | 5.5 | 2.4 | 2.0.6 |
| 575 | 5.75 | 2.5 | 2.1.1 |
| 600 | 6 | 2.7 | 2.1.7 |
| 625 | 6.25 | 2.8 | 2.2.2 |
| 650 | 6.5 | 2.9 | 2.2.8 |
| 675 | 6.75 | 3.0 | 2.3.3 |
| 700 | 7 | 3.2 | 2.3.9 |
| 725 | 7.25 | 3.3 | 2.4.4 |
| 750 | 7.5 | 3.4 | 2.5.0 |
| 775 | 7.75 | 3.5 | 2.5.6 |
| 800 | 8 | 3.6 | 2.6.1 |
| 825 | 8.25 | 3.8 | 2.6.7 |
| 850 | 8.5 | 3.9 | 2.7.2 |
| 875 | 8.75 | 4.0 | 2.7.8 |
| 900 | 9 | 4.1 | 2.8.3 |
| 925 | 9.25 | 4.3 | 2.8.9 |
| 950 | 9.5 | 4.4 | 2.9.4 |
| 975 | 9.75 | 4.5 | 3.0.0 |
| 1000 | 10 | 4.6 | 3.0.6 |
| 1025 | 10.25 | 4.7 | 3.1.1 |
| 1050 | 10.5 | 4.9 | 3.1.7 |
| 1075 | 10.75 | 5.0 | 3.2.2 |
| 1100 | 11 | 5.1 | 3.2.8 |
| 1125 | 11.25 | 5.2 | 3.3.3 |
| 1150 | 11.5 | 5.4 | 3.3.9 |
| 1175 | 11.75 | 5.5 | 3.4.4 |
| 1200 | 12 | 5.6 | 3.5.0 |
11. Bypass Water Calculator
Very lightly roasted coffee requires a low dose and a high water ratio (as above). If you add a lot of milk, as most people do with flat whites, lattes, and cappuccinos, then the light, delicate flavor notes, fruits, acidity, and aromas of a lightly roasted coffee can easily be overwhelmed. Replacing a proportion of the milk with some hot water will bring out the full range of flavors from your coffee beans. This hot water has bypassed the coffee extraction bed (to avoid over-extraction bitterness) – hence the term bypass. Commonly, bypass is used with Americanos and long blacks. But with an increasing trend to lighter roasted coffee, bypass should also start to be included with milk versions.
At the other end of the roast/density spectrum, a very dark roasted bean can be very ashy and burnt-tasting. A large volume of milk helps make a more palatable drink; no bypass hot water is required.
Your coffee is likely to be roasted somewhere between these extremes. The optimum bypass hot water for your roast level will fall on this scale.
12. Taste
Here is some interesting additional information on extraction: Coffee Extraction and How to Taste It – Over/Under Extracted Coffee (baristahustle.com)
Other fields provided on density.coffee:
Coffee Density Range
This is to give you an indication of where your coffee falls on the 150-point Density Range. Where does yours fall if 0% is the lightest roast level you will likely encounter and 100% the darkest?
Drop Temperature
This is information for the coffee roasters.
Roast Name
You’ve probably heard a few roast names. Some refer to the bean’s appearance (Cinnamon), the region it’s from (Viennese), or when it should be drunk (After Dinner).
Despite this, there’s little naming standardization. Some terms are used interchangeably, others can describe a range of roast levels, and the names don’t always directly reference the coffee’s flavors or aromas.
- Light City Roast
- Half City Roast
- Cinnamon
- New England Roast
- American Roast
- City Roast
- Full City Roast
- Vienna Roast
- French Roast
- Italian Roast
https://perfectdailygrind.com/2020/01/light-cinnamon-city-what-do-coffee-roast-names-really-mean/
You are MUCH better off measuring the density to determine which of the 120 Roast Levels you have.
Steamed milk
Milk and coffee are a marriage made in heaven. When milk is steamed to 60 Celsius, it reaches its optimum sweetness. Aerate it just enough to produce a thick paint texture.
Fixed recipes
Most people currently use a fixed 1:2 ratio for espresso.
This ratio evolved back in the ’60s when Robusta proportions in blends skyrocketed to 75% in Italy and France due to widespread coffee rust dieback of Arabica. Espresso roasts were very dark to mask Robusta’s low-quality flavor and inherent bitterness. The roasts became known as French Dark and Italian Roast.
The 1:2 ratio was an average recipe with 25s shot time that would do.
Recently, there has been much more use of Arabica and a desire to roast lighter so you can enjoy the terroir differences. There is a trend for baristas to use more of a 1:2.5 to 1:3 ratio.
However, the actual sweet spot remains an elusive rarity because you are unlikely to hit the sweet spot without tailoring all the parameters to the actual roast level and 120 levels of roasted bean density.
You hear of the God Shot, the once-in-a-lifetime perfect espresso.
When people do get to experience a well extracted coffee, the most often response is one of surprise. I’ve given a black coffee to a person who habitually takes milk and sugar, and they were stunned they could enjoy a black coffee.
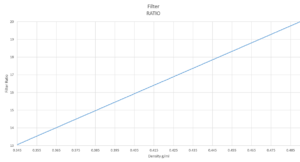
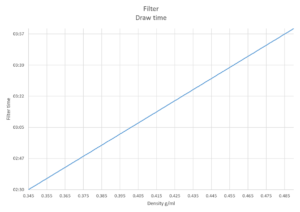
Filter Recipes
The same principles of varying filter parameters relative to Roast Level/density apply to Filter Coffee methods.
Filter Ratio Calculator
Filter ratios vary from 1:13 for a very dark roast needing little water to extract to a very light roast requiring lots of water at a ratio of up to 1:20
Filter Dose Calculator
I use a 480ml Hario Drip Pot with a cloth filter to let through the coffee oils. If you try to make a single cup, the bed depth is not really enough, and it works better as a 2 cup.

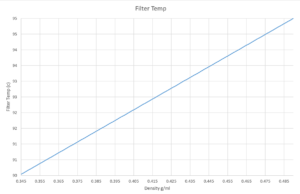
Filter Temperature Calculator
For filter coffee where the contact time is a lot longer, and more temperature is lost over time, higher temperatures are required.
Medium roast brew temperature Celsius is 93 degrees.
Dark roast brew temperature Celsius is 90 degrees.
Filter Time Calculator
Lighter roasts need more contact time to extract, and darker roasts need less.
Coffee Storage
A day out of the freezer = 200 days in the freezer.
Freezing Coffee Beans – Why and How You Should Do It? (baristainstitute.com)
I single-dose my coffee and freeze it in reusable 70ml pots for espresso or 50ml centrifuge tubes for filter-sized doses.
Coffee Tools Comparison
A Coffee Refractometer costs about $730 USD. All it tells you is the Total-Dissolved Solid (TDS) percentage. Maximizing the TDS does not make a better cup of coffee.
In contrast, a 100ml graduated cylinder is cheap ($9 on Amazon). By measuring the density and using density.coffee site, you get a brew guide that tells you the temperature, dose, yield, ratio, pressure, contact time, and optimum age of the beans, and you can even determine the starting grind size. It helps you optimize for sweetness.
Conclusion
Density.coffee is blinding simple.
The density of over 5000 bags of coffee worldwide, have been measured, and data cleansed,
Simple statistical analysis is applied to get the mean, standard deviation, and, for interest’s sake, the probabilities.
The real-world roasted coffee density range is the 95% confidence level.
Extraction recipes are generated
Results from much research, testing, and ongoing revision. It uses computer modelling, predicting over 5000 data points. The computer model has proven to be very successful, to the point that I personally would now not make coffee without it.
In an ideal world, Coffee Roasters, who often do 60kg batch roasts, would measure the density for you. You might find the Roast Date, Density, and QR code on each bag you purchase.
But the reality is using roasted coffee density is a brand-new thing, and it might take a while to catch on. But you can start using it by getting yourself a graduated 100ml cylinder.
The benefits of measuring density to assist with coffee extraction are a liberating revelation.
Exploring the wonderfully diverse world of specialty single-origin coffee becomes a safe and enjoyable prospect when you no longer fear handling some challenging light roast.
Do try it (DAE).

Pingback: How Much Caffeine Is In An Aeropress Coffee – The Green Pods
Pingback: How Much Caffeine Is In 10 Grams Of Coffee Beans? (Caffeine Per Gram Explained) – The Green Pods
Pingback: Bean Density and Its Significance in Coffee Roasting – Do You Even Roast
Nice work… today many roasters are going super light like 0.479 which is damn hard.
However, they brew at a relatively low 93 degrees. Have you ever continued this study?
Hi Stefanus, yes, this study continues to improve. Although some roasters go to extremes of 0.479 and above, in the global statistics I’m collecting, this is less than 1%. Brew temperature actually uses the Arrhenius equation, whereas Density.Coffee currently simply straight-lines it. I’d like to fix this at some point. The effect would be you should be using lower temperatures, 90-93c, and only 95 for absolute extreme cases.
I randomly found this site, but I’m wondering on the methodology for how these numbers were collected. I’m a web developer for my day job with an interest in data science!
Hi Javi,
I am going to publish, full disclosure, and give access to the source data. Get excited, fill you boots checking my data. The only problem is don’t hold your breath. I have a day job and this is a passion project. I definitely will publish sometime soon (maybe within 1 year), and if you are super keen I’ll try and remember to send you a link to pre-release, I need some sanity checkers.
Regards, Richard Mayston
Do you measure shot time for espresso starting when pump is switched on, or from the first drop of coffee?
Hi Marco, first drop. Some scales will do it for you automatically.
Pingback: Why Density is Important and What Affects Coffee Bean Density - TWO | PSBDigital
HI Richard
Thank you for this amazing resource! You have revolutionised my understanding of coffee brewing. What a game changer it has been for me.
I roast our beans on a Behmor roaster and brew espresso with a Profitec 600 and occasionally a V60.
I have a new Option-O P64 Grinder with the Mizen omni burrs. Is the grind setting table showing microns and settings for the P64 or another Option-O grinder?
Microns Monolith Option-O Kinu m47
Regards
John
Hi John,
I’m super glad you are finding it useful.
It is not possible to accurately predict to the micron for every grinder, burr, combinations of bed depths, basket hole sizes, paper flow rates, one side crepe, two side crepe, fast flow paper, non woven…
Most importantly every individual roast of every coffee is going to have its own solubility requirements.
You are really just using grind size to get approximately the extraction time, and then if it is too bitter or too sour change the recipe.
The micron setting must be taken with a grain of salt, and is just an opening gambit. You have to map what the micron provided means for your grinder/burr combination with different roast levels.
I’ve got a P64 with SSP – Unimodal Espresso/Multipurpose burrs, if that helps (probably not).
Kind regards,
Richard Mayston